This guide is for WordPress Version 2.8.5 but may be applicable to older versions.
One of the major reasons why WordPress is considered as the best blogging platform is because it is user-friendly and has thousands of free and premium themes available online. Of course you don’t want to have a blog that looks crappy caused by a poor theme. Have you found a beautiful free theme but don’t know how to install? Then this is the end of your problem.
WordPress theme installation is easy and can be done in less than 10 minutes by following this simple instruction. The most important things that you need to have of course are your theme and an FTP client.
1. Downloading the Theme. Themegrade.com provides the best WordPress themes online so if you find something here that interests you and wanted to use it in your blog, download the theme in your local drive and unzip it in your preferred folder. If possible, unzip it in C:\.
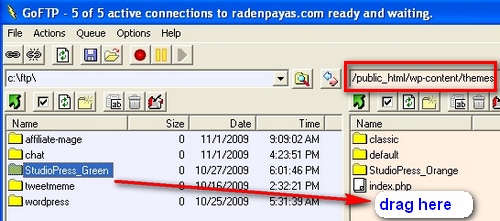
2. Uploading the Theme to Server. Assuming you are using GoFTP, run your FTP client and login to your blog’s FTP administration panel. In your blog’s files, open your “theme folder” (/public_html/wp-content/themes). On the other side of your FTP client screen, open your downloaded theme and upload it to your blog’s themes folder by dragging it. (See image below)

3. Setting File Permissions. (If you are going to edit the file offline, there is no need to perform this step) Now that the whole theme folder has been uploaded to your server, you need to make sure that the files you want to edit later on are writable. You may want to add something on your blog’s sidebar or on single post – make sure these files are writable by changing permissions as shown below (Ex. setting permission for single.php).

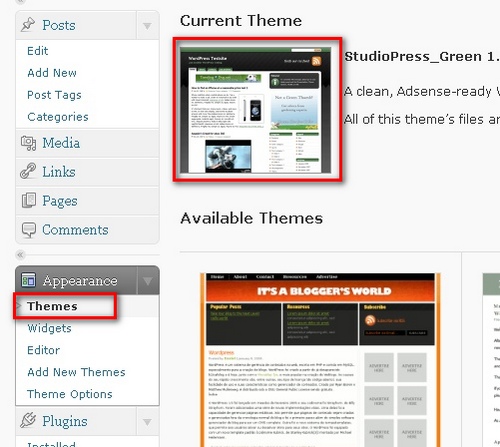
4. Final Installation. Login to your admin panel (yourdomain.com/wp-admin) and click on “Appearance” and then on “Themes”. Click the theme you just uploaded to have a preview and then click on its name located at the upper right corner. You may now try to see it in action by visiting your blog’s homepage.

5. Editing Theme Files. Now that you have a new theme, you might want to edit some files. Just click on “editor” (as shown below), and select the file you want to edit at the right column. As I mentioned on the 2nd step, you must set the file to writable permission if you want to edit it. If in case you missed to set the file permission, you can always access it by logging into your FTP client.

Again, if you choose to edit the theme files offline, you do not need this step.
Quote from a visitor
I never encourage editing WordPress files online, or setting their permissions to 777. Those permissions are a security risk. Using the online editor does not provide a way to back up the files in case something goes wrong. Editing offline allows you to keep a copy of the edited files and reverse the changes quickly.
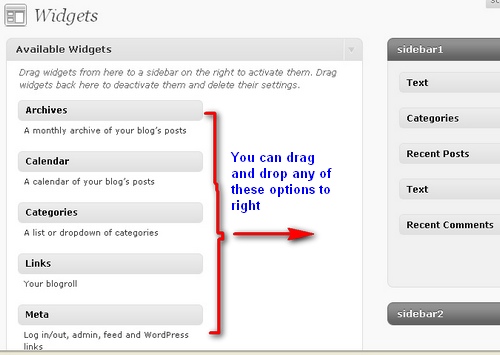
6. Working with Widgets. You can always manipulate your blog’s widgets by dragging the applications to your sidebar.

Installing WordPress theme is easy if you have courage and time to try doing it. If you encounter any problem along the way, jut review the process and make sure you are on the right procedure. You may also visit WordPress Support Forum or post below with your comments or questions.
test

5 Responses